Table of Contents[Hide][Show]
How to Install Zabbix Server on Ubuntu 24.04+−
- Step 1: Update and Upgrade Your System
- Step 2: Install LAMP Stack for Zabbix
- Step 3: Secure MySQL Database
- Step 4: Install Zabbix Server and Frontend
- Step 5: Import the Zabbix Database Schema
- Step 6: Configure Zabbix Server Database Connection
- Step 7: Start and Enable Zabbix Services
- Step 8: Configure PHP for Zabbix Frontend
- Step 9: Restart the Apache Server
- Step 10: Set Up the Zabbix Frontend
- Conclusion
- How to Install Zabbix Server – FAQs
Zabbix is a powerful open-source monitoring solution used to track network devices, servers, applications, and cloud services. It provides real-time monitoring, alerting, and visualization of system performance, making it an essential tool for IT infrastructure management.
If you’re looking for a reliable way to set up Zabbix on your system, this guide will walk you through How to Install Zabbix Server on Ubuntu 24.04 step by step. Whether you’re a system administrator or a DevOps engineer, this tutorial will help you deploy and configure Zabbix with ease.
How to Install Zabbix Server on Ubuntu 24.04
Step 1: Update and Upgrade Your System
Keeping your system up-to-date is crucial before installing any new software. This ensures you have the latest security patches and bug fixes. Let’s refresh the package lists and upgrade your system.
Open your terminal application and run the following commands one at a time, pressing Enter after each:
sudo apt update
sudo apt upgrade
Step 2: Install LAMP Stack for Zabbix
Zabbix relies on a LAMP stack (Linux, Apache, MySQL, and PHP) to function. Let’s install these components together in one step:
sudo apt install apache2 mysql-server php php-mysql libapache2-mod-php
These packages provide all the essential components of the LAMP stack – Apache web server, MySQL database server, and PHP scripting language.
Step 3: Secure MySQL Database
Before creating the Zabbix database, let’s enhance MySQL’s security:
Log in to MySQL as root (temporarily):
sudo mysql -u root
mysql: This command starts the MySQL client program.
-u root: This option specifies the username to connect to MySQL. Here, we’re using “root”, which has full administrative privileges.
Execute the following command to create a database named ‘zabbix‘:
CREATE DATABASE zabbix CHARACTER SET utf8 COLLATE utf8_bin;
CREATE USER 'zabbix'@'localhost' IDENTIFIED BY 'your_password';
GRANT ALL PRIVILEGES ON zabbix.* TO 'zabbix'@'localhost';
set global log_bin_trust_function_creators = 1;
FLUSH PRIVILEGES;
EXIT;
Note:
CREATE DATABASE: This statement creates a new database in MySQL.
zabbix: Replace this with your desired database name if needed.
Step 4: Install Zabbix Server and Frontend
Now, we’ll configure our system to access the official Zabbix repositories and install the necessary server and frontend components using the following command:
wget https://repo.zabbix.com/zabbix/7.0/ubuntu/pool/main/z/zabbix-release/zabbix-release_7.0-2+ubuntu24.04_all.deb
sudo dpkg -i zabbix-release_7.0-2+ubuntu24.04_all.deb
We’ll install some additional Zabbix packages to complete the setup.
sudo apt update sudo apt install zabbix-server-mysql zabbix-frontend-php zabbix-apache-conf zabbix-sql-scripts zabbix-agent
Step 5: Import the Zabbix Database Schema
Now, we’ll import the initial schema and data for Zabbix into the database you created earlier. To do that, run the following command:
sudo zcat /usr/share/zabbix-sql-scripts/mysql/server.sql.gz | mysql --default-character-set=utf8mb4 -uzabbix -p Zabbix
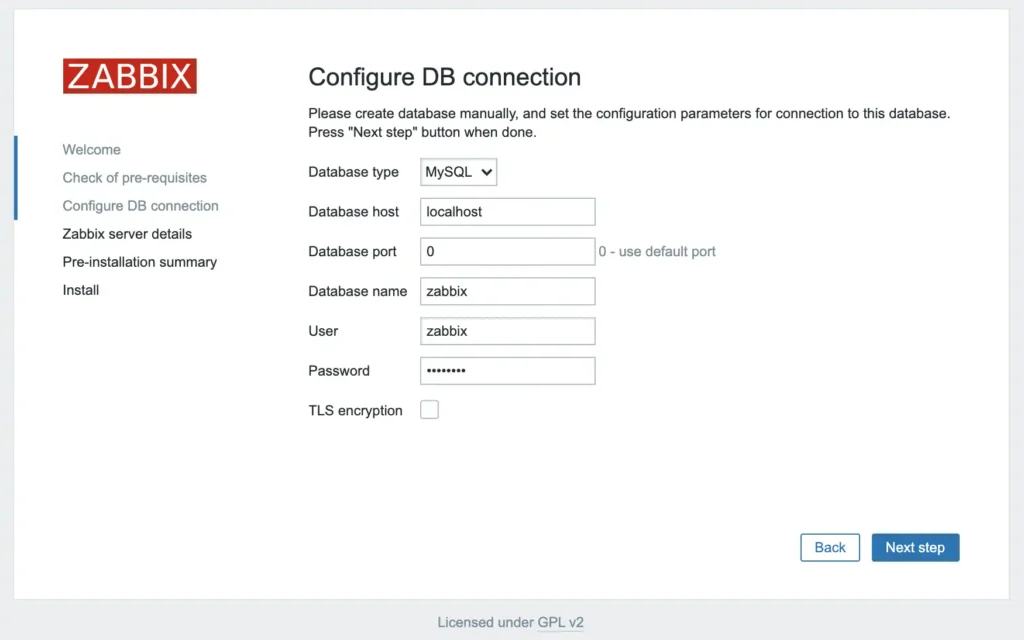
Step 6: Configure Zabbix Server Database Connection
In this step, we’ll modify the Zabbix server configuration file to specify the connection details for your MySQL database. To edit the Zabbix server configuration, run the following command:
sudo nano /etc/zabbix/zabbix_server.conf
Within the database settings section, find and modify the following entries to reflect your MySQL database information:
DBHost=localhost
DBName=Zabbix
DBUser=Zabbix
DBPassword=your_password
DBHost: Set this to the hostname or IP address of your MySQL server (likely “localhost” if it’s on the same machine).
DBName: Update this with the name of the database you created for Zabbix (e.g., “zabbix“).
DBUser: Change this to the username you created for Zabbix database access (e.g., “zabbix“).
DBPassword: Replace this placeholder with the secure password you set for the Zabbix user.
Save and Close the File: In nano, press Ctrl+O to save the changes and Ctrl+X to exit the editor.
Step 7: Start and Enable Zabbix Services
Now that the configuration is complete, let’s start the Zabbix server and enable both the server and agent services to launch automatically at system boot.
sudo systemctl start zabbix-server zabbix-agent apache2
sudo systemctl enable zabbix-server zabbix-agent apache2
Step 8: Configure PHP for Zabbix Frontend
Edit the PHP configuration file for Zabbix:
sudo nano /etc/zabbix/apache.conf
By default, the Zabbix frontend might display times in the server’s time zone. If you want the Zabbix interface to reflect a different time zone, you can adjust this setting within the Zabbix frontend configuration.
To do that, find the following line and replace it with your time zone:
php_value date.timezone Europe/London
Step 9: Restart the Apache Server
To apply the changes, restart the Apache server with the following command:
sudo systemctl restart apache2
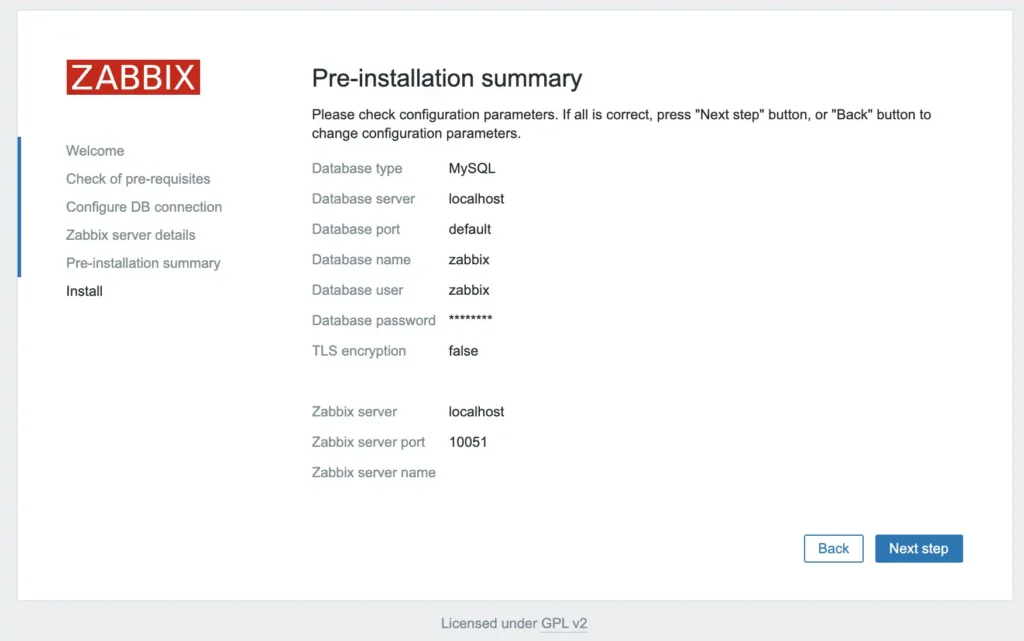
Step 10: Set Up the Zabbix Frontend
Open your web browser and navigate to `http://your_server_ip/zabbix`.
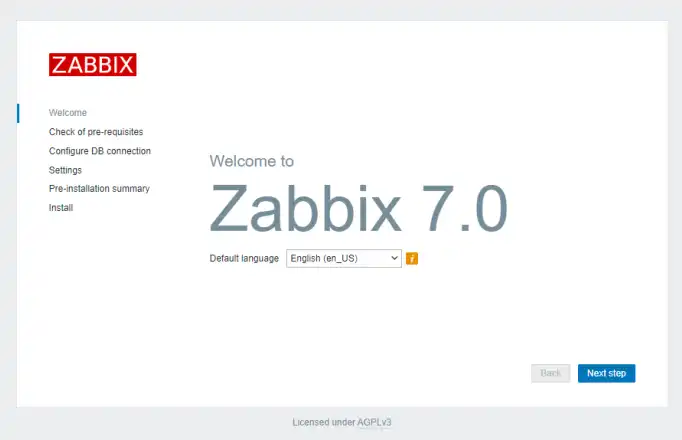
Follow the on-screen instructions to complete the setup.
Enter the database details you configured earlier when prompted.
Use “Admin” as the default username and “zabbix” as the password to log in to the dashboard.

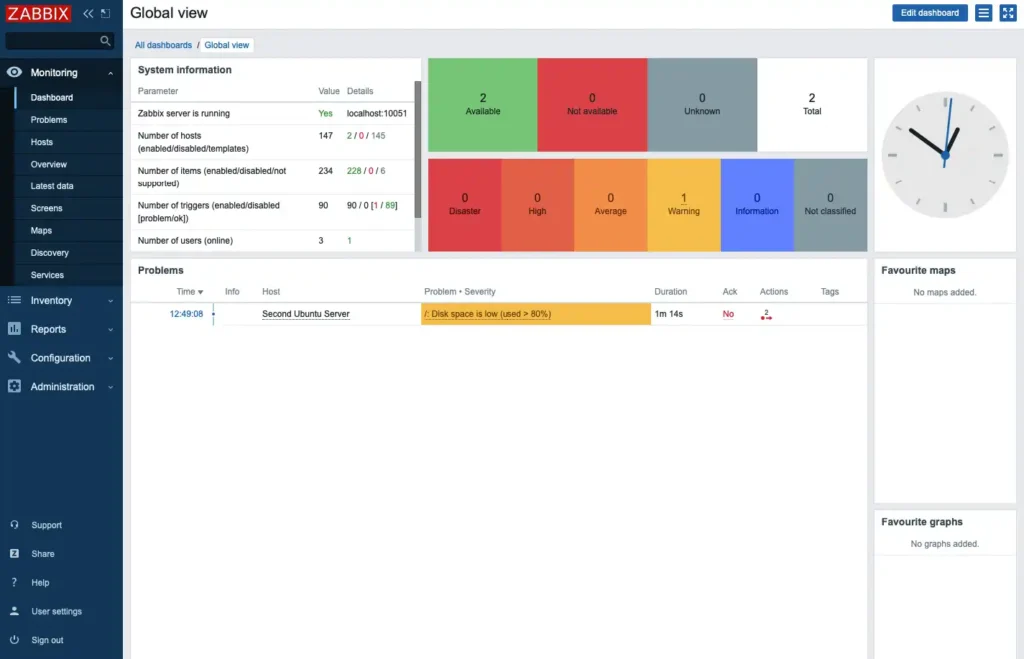
Conclusion
Congratulations! You’ve successfully installed and configured a Zabbix server on your Ubuntu 24.04 system. Now you have a powerful monitoring tool at your disposal to keep a watchful eye on your network’s health.
With this guide on How to Install Zabbix Server on Ubuntu, you can now effectively monitor your infrastructure and receive timely alerts about potential issues. Keep your Zabbix setup updated and optimized to ensure smooth and efficient performance monitoring.
Here are some next steps to consider:
- Access the Zabbix Web Interface: Open a web browser and navigate to
http://[your_server_ip_or_hostname]/zabbixto access the Zabbix web interface. Use the username and password you created for the Zabbix user during the database setup to log in. - Configure Zabbix Monitoring: Explore the Zabbix web interface to configure monitoring for your devices and systems. You can add hosts, configure items to be monitored, define triggers and alerts, and create user accounts with different access levels.
- Explore Zabbix Documentation: The Zabbix official documentation provides extensive resources to help you learn more about configuring, using, and customizing Zabbix to fit your specific needs. You can find the documentation here: https://www.zabbix.com/manuals
By following these steps and exploring the Zabbix documentation, you’ll be well on your way to effectively monitoring your IT infrastructure with Zabbix.
How to Install Zabbix Server – FAQs
This section addresses some common questions that might arise during the Zabbix server installation process on Ubuntu 24.04:
What if I don’t have a static IP address configured?
A static IP address is recommended for the server you’re installing Zabbix on. If you can’t configure a static IP, you can still proceed with the installation. However, you’ll need to replace [your_server_ip_or_hostname] in the web interface access URL (mentioned in the conclusion) with the actual IP address assigned to your server (which might change dynamically).
Can I use a different database server than MySQL?
Zabbix officially supports MySQL, PostgreSQL, and Oracle as database backends. While the guide focused on MySQL, the general installation steps would be similar for other supported databases. You’ll need to consult the Zabbix documentation for specific instructions on installing and configuring those alternatives.
Where can I find the password for the Zabbix user created during the installation?
The password you set for the Zabbix user during database setup is crucial for accessing the Zabbix web interface. It’s recommended to store this password securely using a password manager. If you forget the password, you’ll need to reset it by modifying the MySQL user table directly (which is beyond the scope of this guide).
I encountered an error during the installation. What should I do?
If you run into errors during the installation process, carefully review the error messages displayed on the terminal. These messages often provide clues about the cause of the problem. You can also search online forums or communities dedicated to Zabbix for solutions related to specific error codes.
How do I configure Zabbix to monitor my specific devices and systems?
The Zabbix web interface provides a user-friendly way to define what you want to monitor. You can add hosts (devices or systems), configure items to collect data (e.g., CPU usage, memory availability), set up triggers and alerts based on thresholds, and manage user accounts with different access levels. Refer to the Zabbix official documentation (linked in the conclusion) for detailed instructions on configuration.
 How to Install Pip on Ubuntu: 5 Easy Steps